

Your first day in the AR operator portal
Log in, orient yourself around the portal, and identify which customers need attention today. About fifteen minutes.
This tutorial walks you through your first session in the Drypowder AR operator portal. By the end you will know how to navigate the platform, review your accounts, and identify which customers need attention today.
Plan on about fifteen minutes. You do not need to configure anything in advance, because your AR data is already syncing from Spruce, or if your dealership uses file-based integration, was uploaded by CSV.
Step 1: Log in
Open the portal URL provided by your administrator, enter your email address and password, then click Sign in.
You will land on the Customers page, which is your home screen.
Step 2: Orient yourself
The portal has three main sections, all reachable from the left navigation:
- Customers — Your customer accounts, their balances, aging, and Collection Priority scores. This is where you will spend most of your time.
- Invoices — All receivables invoices, grouped by status such as current or past due.
- Payments — Two tabs that you will get to know well: Incoming Payments for tracking payments received from customers, and Settlements for batch reconciliation and GL posting.
There is also an Integration page for managing your data sync or file uploads, and a Settings page for company configuration.
For now, stay on the Customers page.
Step 3: Understand the Customers Dashboard
Each row on the Customers Dashboard represents one customer account. The key columns are:
| Column | What it tells you |
|---|---|
| Account Name | The customer name with their external account ID |
| Priority | A 0 to 10 score ranking how urgently this account needs attention |
| Outstanding | Total outstanding amount across invoices and adjustments |
| Invoices | Current and past-due invoice amounts |
| Debit / Credit Adjustments | Outstanding adjustment amounts |
| Wtd. Avg. Days Overdue | Weighted average days past due across all invoices |
| Aging Buckets | Amounts in 1 to 30, 31 to 60, 61 to 90, and 91-plus day ranges |
The dashboard defaults to sorting by Collection Priority, highest first. The accounts that most need your attention sit at the top.
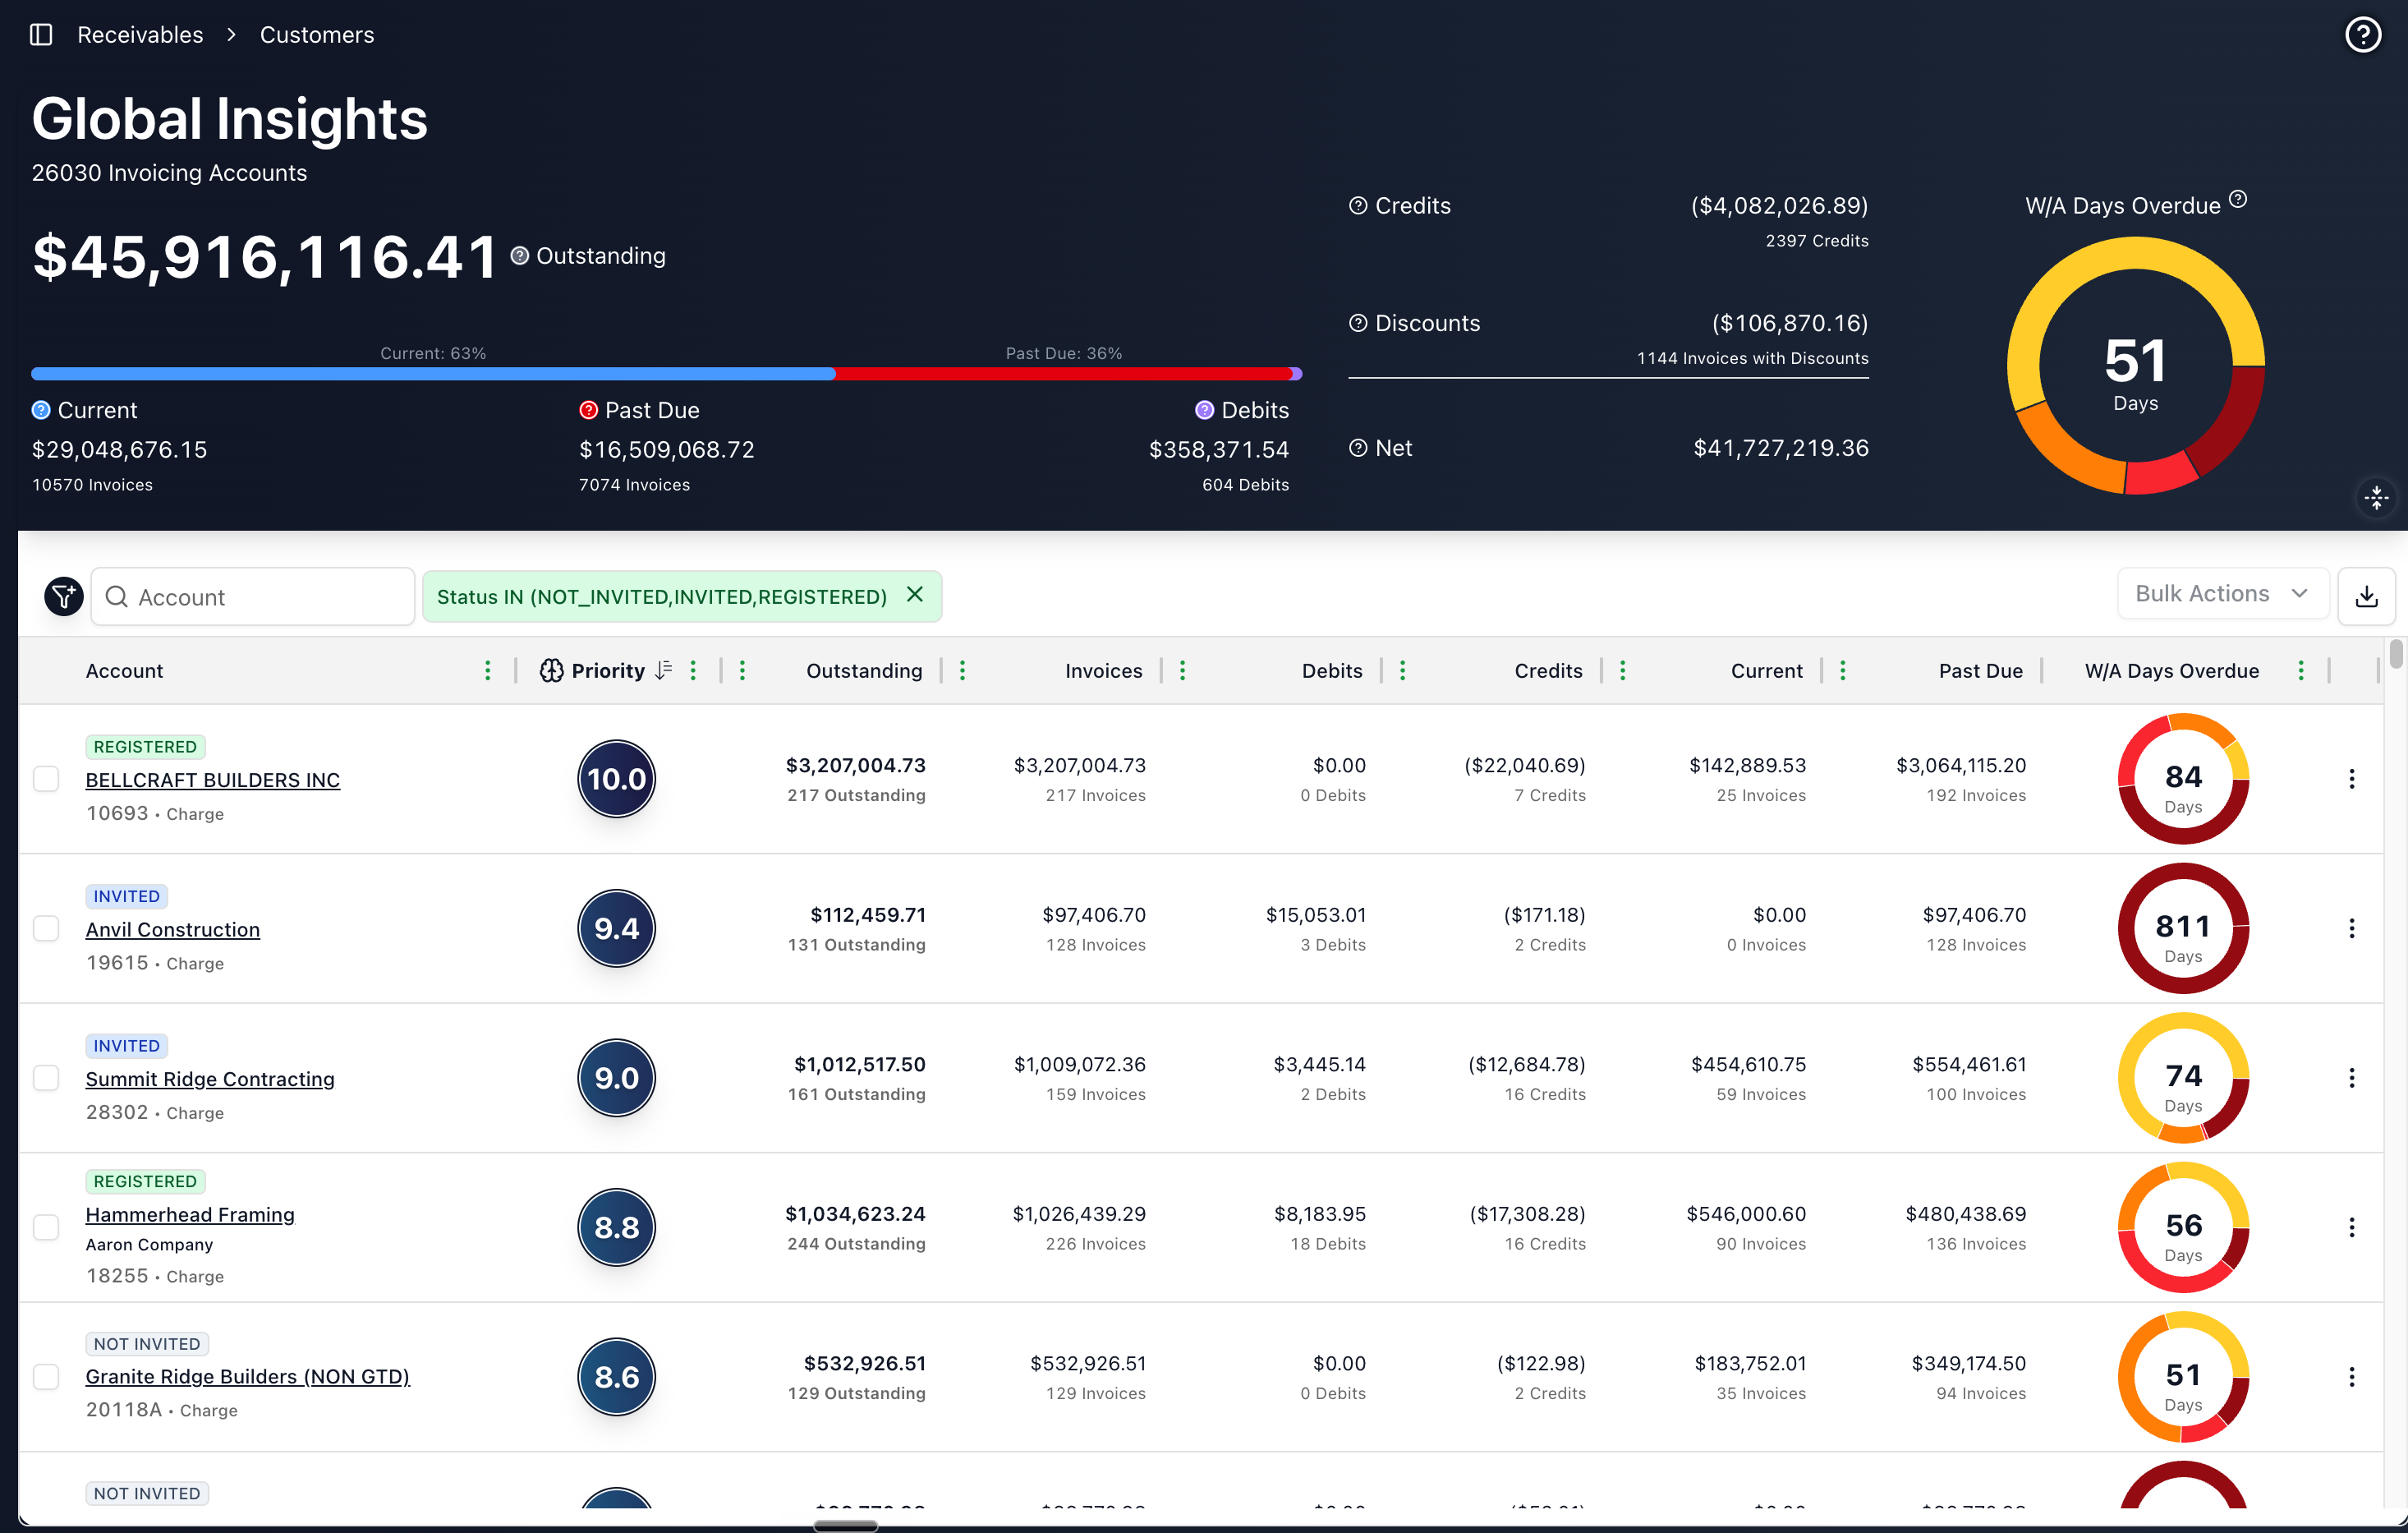
Step 4: Read the stats panel
Above the customer list, a collapsible Stats Panel shows aggregate numbers for your entire AR portfolio:
- Outstanding invoices — Total amount and count
- Current invoices — Amount not yet past due
- Past due invoices — Amount past due
- Debit and credit adjustments — Outstanding adjustment totals
- Net AR amount — Your effective receivables balance
- Invoicing account count — How many customer accounts you have
This panel gives you a snapshot of your overall AR health without your needing to click into individual accounts.
Step 5: Read a Collection Priority score
Collection Priority (shown as the Priority column, and Smart Priority when you filter on it) is a numeric score from 0 to 10 that ranks how urgently each account needs collections attention. A score of 10 means the account is the highest priority, and a score near 0 means it is in good shape.
The score is based on each account's impact to your Weighted Average Days Overdue (WADO): accounts that contribute most to your WADO score highest. It is a single WADO-based signal, so it points you straight to where collecting will move the needle most. Start at the top of the list and work down.
Step 6: Click into a customer
Click any customer row to open the account detail view. You will see a tabbed interface:
- Invoices — Every invoice for this customer, filterable by status such as open, paid, or partially paid. Shows invoice number, amount, due date, aging, and line item statuses.
- Debits & Charges — Any debit adjustments on the account, such as overpayments, finance charges, or additional charges.
- Credits — Any credit adjustments or discounts applied to the account.
- Payments — Incoming payments received from this customer through Drypowder.
Take a moment to explore one of your higher-priority accounts. The invoices tab shows exactly what the customer owes, with aging information per invoice.
Step 7: Check the Payments page
Navigate to the Payments page from the left sidebar. It has two tabs.
Incoming Payments shows every payment received from your customers. Each row shows the account (customer name and external account ID), the amounts applied to invoices, debits, and credits, the total and fee, the payment date, the type (ACH, Card, Wallet, or RTP), the status (Pending, Settled/Completed, Failed, Frozen, Terminated, Reversed, or Canceled), and the completed date.
You can filter by status, date range, amount, and account. A statistics panel summarizes completed-versus-pending counts and a payment-method breakdown over a selectable time range, with a Download Chart Data export.
Settlements shows batch settlement records for reconciliation. This is where you post payments to the Spruce GL. We will cover that in Your first settlement reconciliation.
Step 8: Invite a customer
If you want to get a customer paying through Drypowder, you need to invite them to the Payments portal. Open a customer's detail view and click Invite; in the Invite to Drypowder dialog you confirm the contact's name and email, then click Send. (Customers can also request access themselves through a self-service form that you approve.)
The customer receives an email invitation to register. Once they register, they can sign in to the Payments portal, see their open invoices, and pay by ACH or card.
What to do next
You have seen the main areas of the AR operator portal. Here are some natural next steps:
- Invite a customer to pay online — Walk through the invitation process end to end.
- Review and prioritize accounts — Build your daily workflow using Collection Priority and filters.
- Collection Priority reference — Full documentation on how the score works.
- Customers Dashboard reference — Every field and filter on the dashboard.